Your UK Property Sale is at Risk: The Urgent Guide to Spray Foam Removal
September 2025. You’ve found a buyer, the sale is progressing, and then the surveyor's report lands like a lead weight. The words “spray foam insulation” are highlighted, and your mortgage lender has just put the entire transaction on hold. This scenario is becoming increasingly common across the UK, turning a dream sale into a costly nightmare.
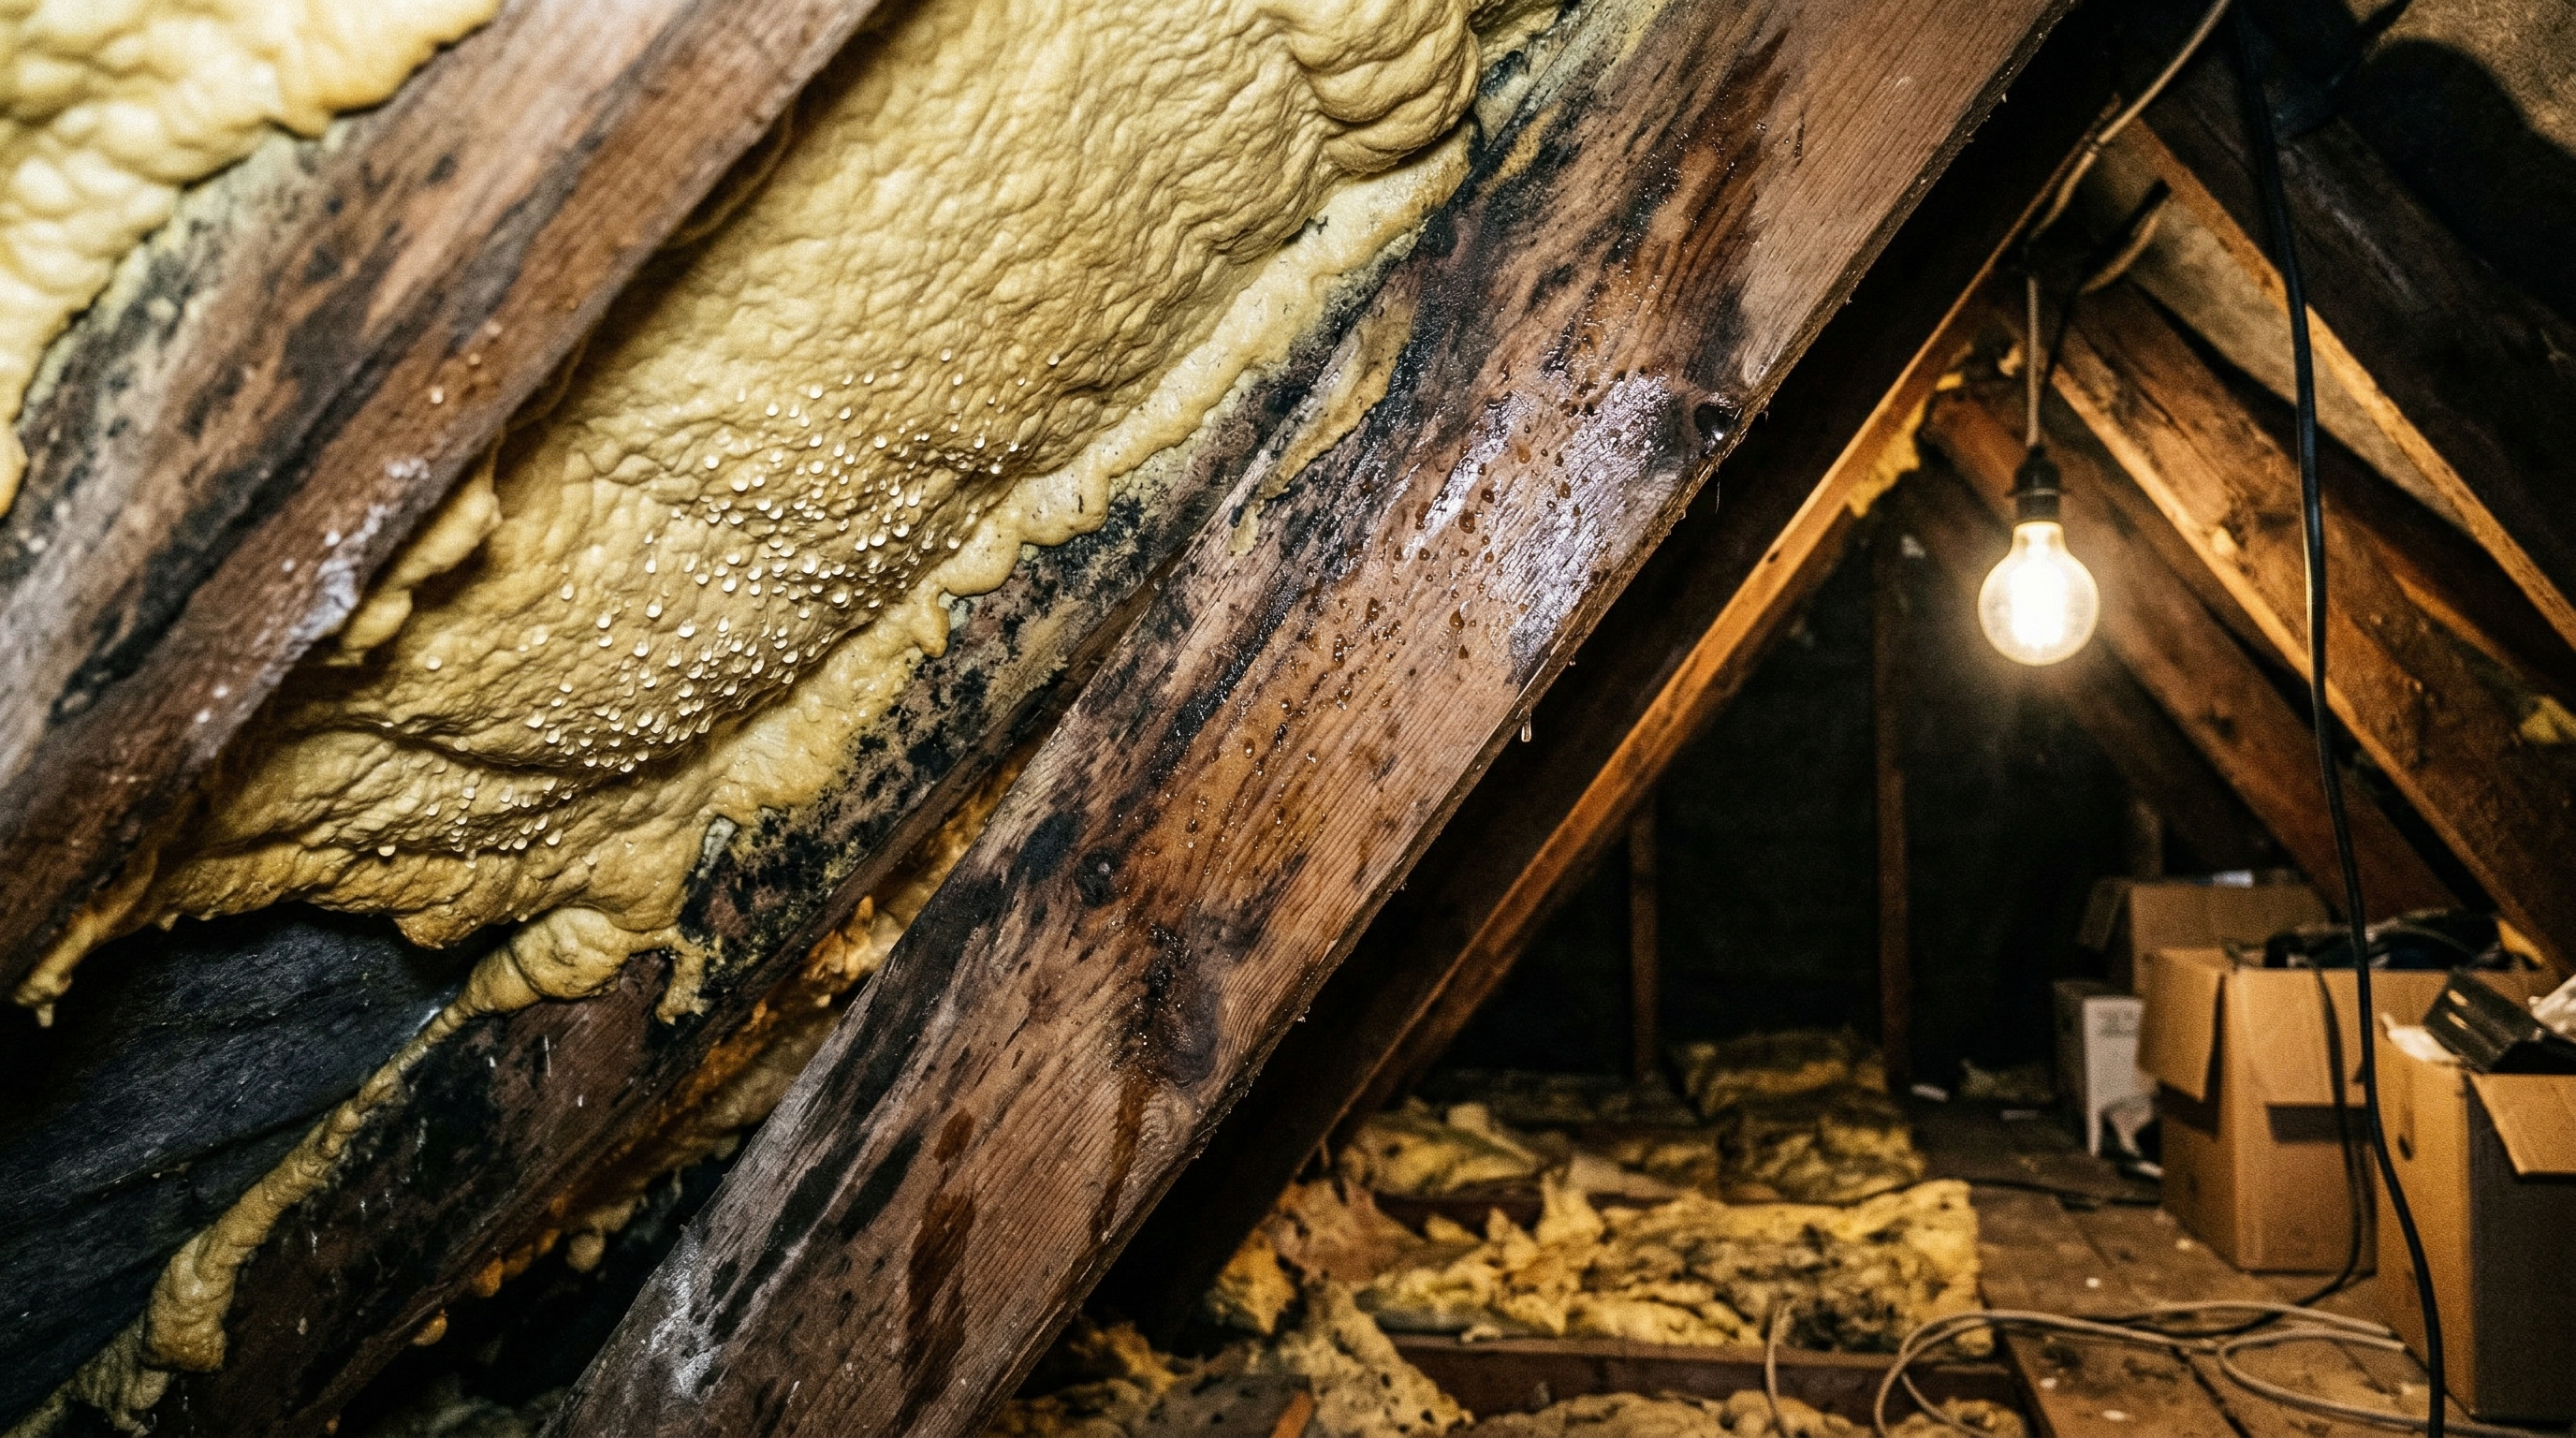
If you have polyurethane spray foam in your loft or roof space, you are facing a significant hurdle in selling or remortgaging your property. UK lenders and the Royal Institution of Chartered Surveyors (RICS) view it as a potential risk, fearing it can trap moisture, cause timber rot, and mask structural issues.
But there is a clear path forward. This is not the time for panic; it's the time for a precise, professional action plan. This guide provides the seven essential steps you must take to professionally remove spray foam insulation, satisfy mortgage lenders, and get your property transaction back on track.
Step 1: Professional Assessment & Foam Identification
Before any work begins, you need to know exactly what you’re dealing with. Not all spray foam is created equal, and the type directly impacts the removal method, cost, and timeline.
Open-Cell vs. Closed-Cell Foam:
- Open-Cell Foam: This is a softer, more flexible foam that expands significantly upon application. It has a sponge-like texture. While it's a good air barrier, it can absorb and hold water if there's a leak, potentially damaging roof timbers. Its softer consistency generally makes it easier (and slightly cheaper) to remove.
- Closed-Cell Foam: This is a rigid, dense foam that sets hard. It is a powerful insulator and acts as a vapour barrier, but its rigidity can be its downfall. It can put stress on roof structures and is significantly more difficult to remove, often requiring specialised tools and more labour-intensive methods. It adheres aggressively to timbers and tiles.
What a Professional Assessment Involves:
A reputable spray foam removal specialist will conduct a thorough survey of your loft space. This isn't just a quick look; it involves:
- Identifying the foam type (open-cell or closed-cell).
- Measuring the total area (in square metres) covered by the foam.
- Assessing the depth and consistency of the application.
- Inspecting the condition of the underlying roof timbers and felt. This is critical, as the primary concern for lenders is hidden damage.
- Checking for ventilation pathways that may have been blocked by the foam.
- Providing a detailed report and a fixed-price quotation. Avoid any company that gives you a vague estimate over the phone without an inspection.
This initial step is non-negotiable. It provides the roadmap for the entire project and gives you the concrete information needed for Step 2.
Step 2: Understanding the Surveyor's Report & Lender Requirements
Your surveyor’s report is your key document. It will explicitly state why the spray foam is a problem. Typically, the concerns fall into these categories:
- Concealed Structure: The foam completely covers the roof timbers, making it impossible for a surveyor to assess their condition for rot, insect infestation, or structural defects.
- Trapped Moisture: The foam can reduce or eliminate airflow around the timbers. If a roof leak occurs, moisture can get trapped between the foam and the wood, leading to rapid decay.
- Roof Integrity: In the case of closed-cell foam, it can bond the roof tiles together, making individual tile replacement impossible without causing widespread damage.
Your task is to liaise with your estate agent, mortgage broker, or lender to understand their precise requirements. Ask them directly: “What documentation do you need to see post-removal to proceed with the mortgage application?”
They will almost certainly require:
- An invoice from a professional, VAT-registered removal company.
- A certificate of completion or a guarantee for the work.
- Evidence of correct waste disposal (a waste transfer note).
- Potentially, a post-removal inspection by a RICS surveyor to confirm the roof structure is sound.
Getting this clarity upfront prevents you from spending thousands on removal only to find you’ve missed a crucial piece of paperwork.
Step 3: Vetting & Choosing a Specialist Removal Company
This is the most critical decision you'll make. The quality of the removal directly impacts your ability to secure a mortgage. The UK market has seen a surge in 'specialists', but not all are qualified.
Your Vetting Checklist:
- Insurance: Do they have comprehensive Public Liability and Employers' Liability insurance? Ask to see the certificates. This protects you and your property.
- Experience: How long have they specialised exclusively in spray foam removal? A general building firm is not a specialist. Ask for case studies or references from properties similar to yours.
- Methodology: What is their removal process? They should be able to explain their methods for both open-cell and closed-cell foam. For closed-cell, this involves controlled mechanical removal using specialised scrapers, blades and cutting tools that detach the foam without damaging the timbers. Avoid companies that suggest aggressive wire brushing or high-pressure water, which can damage the wood.
- Waste Disposal: Are they registered waste carriers? They must dispose of the removed foam in accordance with UK environmental regulations and provide you with a waste transfer note. This is a legal requirement.
- Quotation: Is the quote detailed and fixed? It should break down the cost of labour, materials, equipment, and waste disposal. Be wary of any hidden 'extras'.
- Reviews & Reputation: Check online reviews (Google, Checkatrade, Trustpilot), but also seek professional recommendations from surveyors or estate agents if possible.
Current 2025 UK Spray Foam Removal Costs:
Prices can vary based on location (costs in London and the South East are often higher), foam type, roof complexity, and accessibility. However, as a 2025 benchmark, expect to pay:
- Open-Cell Foam Removal: £40 - £55 per square metre.
- Closed-Cell Foam Removal: £50 - £70 per square metre.
For a typical 3-bedroom semi-detached house with a 60-70m² loft, the total cost could range from £2,500 to £5,000 + VAT. This is a significant investment, which is why choosing the right company is paramount.
Step 4: The Professional Removal Process Explained
Once you’ve commissioned a specialist, the physical work can begin. A professional operation is clean, efficient, and safe. Here’s what you should expect.
Preparation:
- Sealing the Work Area: The team will seal off the loft hatch and any other access points with heavy-duty plastic sheeting to prevent dust and debris from contaminating the rest of your home.
- Protecting Your Property: Dust sheets will be laid from your front door to the loft access.
- Setting up Equipment: This includes bringing in specialised cutting or blasting equipment, high-powered HEPA filter vacuums, and ventilation fans.
The Removal:
The method depends on the foam type:
- Open-Cell Foam: This is often removed manually using specialised saws, scrapers, and blades. The team will cut the foam away in large sections from between the roof rafters.
- Closed-Cell Foam: This requires a more meticulous approach. Technicians use controlled mechanical removal — specialised scrapers, blades and cutting tools — to detach the rigid foam from the substrate without abrading the timber, then work back to bare wood by hand. (Some companies market dry ice blasting for this, but it is not an approved method: the extreme cold and force can crack tiles, split timber battens and degrade roofing felt.)
The Fine Detailing:
After the bulk of the foam is removed, the team will meticulously clean the rafters and timbers, removing any remaining residue. This is a crucial stage, as surveyors will inspect the wood closely. A powerful vacuum system is used throughout to manage dust and particles.
Timeline:
- Average 3-bed semi-detached: 2-4 days.
- Larger or more complex roofs (e.g., with dormers): 4-6 days.
Your chosen company should provide a clear project timeline from the outset.
Step 5: Compliant Waste Disposal & Site Clearance
Properly removing the foam is only half the job. Disposing of it correctly is a legal requirement and something mortgage lenders look for.
Cured polyurethane foam is classified as non-hazardous waste in the UK, but it is bulky and cannot be disposed of in your household bin or taken to a local tip in large quantities.
A professional removal company must:
- Be a registered upper-tier waste carrier with the Environment Agency.
- Bag and remove all foam debris from your property.
- Transport it to a licensed commercial waste facility.
- Provide you with a Waste Transfer Note. This is your legal proof of compliant disposal. Keep this document safe with your other property files.
At the end of the project, the team should leave your property, particularly the access route and loft area, as clean as they found it. A final vacuum and wipe-down of all surfaces is standard practice for a reputable firm.
Step 6: Post-Removal Inspection & Certification
With the foam gone and the site cleared, you now need to prove the job has been done correctly and that the roof structure is sound. This is the step that satisfies the lenders.
- Contractor's Guarantee: Your removal company should provide you with a certificate of completion and, ideally, an insurance-backed guarantee for their work. This shows the work was performed by a professional entity.
- Independent Surveyor's Report: It is highly recommended (and often required by lenders) to commission a new RICS surveyor's report after the removal. This independent inspection will confirm:
- All foam has been successfully removed.
- The roof timbers are now fully visible and can be assessed.
- There is no evidence of rot, damage, or moisture issues that were previously hidden.
This new, clean report is the ultimate green light for a mortgage lender. It replaces the previous problematic survey and demonstrates that you have proactively and professionally resolved the issue.
Step 7: Re-insulating Your Loft & Future-Proofing
Now that the problematic foam is gone, your loft is a blank canvas. However, it's also uninsulated. To comply with UK Building Regulations Part L (Conservation of fuel and power) and ensure your home is energy-efficient, you must re-insulate.
Mortgage-Friendly Insulation Options:
- Mineral Wool Insulation (e.g., Rockwool, Knauf): This is the most common and widely accepted form of loft insulation. It is laid in rolls between and then across the ceiling joists to a recommended depth of 270mm. It's non-combustible, allows the structure to breathe, and is looked upon favourably by all lenders.
- Sheep's Wool Insulation: A natural, breathable, and sustainable option that performs excellently.
- Rigid Insulation Boards (PIR): These can be used, but must be installed correctly with appropriate air gaps to ensure ventilation is not compromised.
Crucially, ensure:
- Ventilation is maintained. Soffit vents and ridge vents must be kept clear to allow for airflow in the roof space, which prevents condensation.
- Insulation is laid on the loft floor, not the roof pitch. Insulating at the rafter level (a 'warm roof') is a specialist job and requires a different approach to ventilation. For most UK homes, a 'cold roof' design with insulation at the joist level is standard and preferred by surveyors.
Completing this final step not only makes your home compliant and efficient but also presents a perfectly insulated, well-ventilated, and easily inspectable roof space to any future surveyor—future-proofing your property's value and mortgage-ability.
Frequently Asked Questions (FAQ) - 2025 UK Edition
Q1: Why is spray foam insulation a problem for UK mortgages?
UK mortgage lenders are cautious because spray foam can trap moisture against roof timbers, leading to rot. It also covers the structure, making it impossible for a surveyor to inspect the condition of the roof, a critical part of their valuation assessment. This lack of visibility is a major red flag.
Q2: Can I just get a specialist report saying my foam is fine?
While some companies offer 'certification' for existing foam, most major UK lenders in 2025 will not accept this. Their policy is often black and white: if the foam obstructs a structural inspection, it must be removed before they will lend against the property.
Q3: Is it possible to remove spray foam myself (DIY)?
It is strongly discouraged. Removing spray foam, especially closed-cell, requires specialised equipment and techniques to avoid damaging the roof timbers or membrane. Furthermore, the dust and particles released can be a respiratory hazard. A DIY job will not come with the professional certification and waste disposal notes required by lenders.
Q4: How long does the entire process take, from quote to completion?
Typically, you should budget for 2-4 weeks. This includes: 1-3 days for an initial survey and quote, a 1-2 week lead time for booking the work, 2-5 days for the physical removal, and a few days to arrange a post-removal surveyor's inspection.
Q5: Will the removal process damage my roof tiles or felt?
A professional company using the correct techniques — controlled mechanical removal with specialised hand tools — will not damage your roof structure. Their methods are designed to be effective on the foam but non-abrasive to the underlying timber and tiles. This is a key reason to avoid unqualified general builders.
Q6: My spray foam was installed with a 25-year guarantee. Is this worthless?
Unfortunately, regarding a mortgage application, yes. The installer's guarantee covers the performance of the insulation product itself, not the issues it creates for surveyors and lenders. The problem isn't that the foam has failed, but that its presence makes the property unmortgageable in the eyes of many providers.
Q7: What's the difference in cost between open-cell and closed-cell removal?
Closed-cell foam removal is typically 20-30% more expensive than open-cell. This is because it's denser, adheres more strongly, and requires more specialised mechanical tools and more man-hours to remove completely without damaging the roof structure.
Q8: Will removing the foam devalue my property?
No, it will do the opposite. By removing the spray foam and replacing it with a conventional, lender-approved insulation, you are removing a major barrier to sale. This action restores the property's market value and makes it accessible to the vast majority of buyers who require a mortgage.
Your Next Step: Take Action Today
You are now equipped with the knowledge to tackle your spray foam problem head-on. The key is to act decisively and choose the right professional partner. Delaying the process will only prolong the stress and uncertainty surrounding your property transaction.
Do not let spray foam derail your plans. By following these seven steps, you can systematically remove the issue, satisfy your lender, and secure the future of your property sale or remortgage.
Ready to get your property mortgage-ready? Contact our team today for a no-obligation site survey and a fixed-price quotation for professional spray foam removal. [Link to: Contact Us Page]